Make a great first impression: A step-by-step guide for successful user onboarding

User acquisition and onboarding 101
To make sure we’re all on the same page, onboarding is the journey a new customer takes from learning about your product to registering an account and receiving that first bit of value. It’s a tricky handoff between the “marketing customer experience” and the “product user experience.”
Companies of all sizes can mess this up because they exclusively obsess over two things without thinking about how they connect:
The product, features, and functionality, and
The front page of their website.
They think their front page is so compelling that people will just sign up and find the magic on their own. Then, when the rubber hits the road and the conversion numbers are low, they’ll resort to tooltips, training pop-ups, and videos. Maybe they’ll struggle through a/b tests, all without really stopping to research or really think about their audience’s “why.”
Let me say this: training is a poor excuse for bad design.
The good news is that the solution is rarely more features. Instead, it usually involves refining the flows and copy that accompany every single step of the onboarding process.
“Onboarding is like a first date. You’ve discovered each other, and now you’re out for the first time, getting to know the other person. It is the point at which people learn the value of what you have to offer, and decide whether it works for them.” - User Interface Engineering on Medium.
Take a step back and imagine a first date. Do you spill all the beans, telling your date all the good (and bad) about you? Or, do you keep it light and fun to gauge if you have enough interest to go on a second date?
Hopefully, your dating rule-of-thumb is the latter: give away enough information and personality to get the next date 💞.
During onboarding, new customers learn just enough about the value your product offers to decide whether it works for them (and, therefore, if they want to go on a second date).
Practically speaking, the onboarding process spans from marketing landing pages through sign-up forms, new user account creation, and getting started.
User acquisition and onboarding are a universal challenge that both marketing and product must solve, but it can fall through the cracks without the right people or support. In comes you, PMM 🦸.
On the marketing side, you must:
Find or create demand
Affordably attract visitors to the website
Persuade them to sign up
On the product side, you must:
Streamline sign-up forms to collect only the information needed
Add clear copy that moves the new user through each step
Ensure the initial product UX looks and functions as intended
If you ask me, it’s the start of a full and beautiful romance 😍. Now, let’s dive into my step-by-step guide for user onboarding.
Onboarding: A step-by-step guide
FYI: I’m using a project management software example in my framework below, where Sam is the primary customer/champion for the software and now has to ensure their team gets the most out of it. On Sam’s team are Jordan and Jessie. Sam is a Consulting Partner at a Boutique Consulting Company of about 100 people.
Bonus: Use this free bundle of assets to implement this step-by-step framework.

Step 1: Your target customer
In this example, we need to design two onboarding experiences: one for Sam, and another for their team (Jordan and Jessie).
This is where your persona work comes in. Focusing on Sam, you need answers to the following:
What problem are they currently experiencing?
How are they feeling?
Where do they first look for help?
How do they find you?
What is the one thing they need right now that you can help them with?

Step 2: Evaluate the current state of your onboarding
Rarely do we have the luxury of crafting user onboarding from scratch, so start with a deep review of the existing user flows on your current product (and a competitor’s product, too, for good measure).
Establish which user flows you will evaluate. At a minimum, focus on sign-up and activation (the first bit of value). This includes your customer’s starting point, such as an ad, the homepage, or an app store.
For our working example, we would start at the homepage on a phone since that’s Sam’s starting point. We would also evaluate sign-up and the first-time user experience.
With the customer’s hat on from the initial starting point, very slowly step through the flow. At each step/click, answer these questions:
What are my first impressions?
What stands out to me?
What questions are coming to mind?
What do I want to do first?
What do I think this product is?
Repeat this twice, documenting your notes and reviewing the problems you’ve outlined.
Does the problem appear in a single location or multiple places?
Are there problems with the overall structure of the user experience?
Is it too much information that you’re overwhelmed? Or, is it not enough information that you’re lost?
What seems to be missing?

Step 3: Craft a new storyline
The best onboarding follows the structure of a good storyline: set up the story, develop the plot, and reach a resolution. Before we lay out the design and screens, let’s write a story outline.
Act 1: Set up the story
Who makes up your general target market?
Ex: Small to mid-sized consulting companies
What are their big goals irrespective of a specific technology, tool, or product?
Ex: To build and maintain high levels of client satisfaction and maintain a reputation for delivering high-quality consulting services
What are their biggest problems?
Ex: Lack of structure, chaos in managing a variety of clients and needs, repeated non-billable work
Who are they working with?
Ex: Coworkers, employees, consulting clients.
What is your product?
Ex: Collaboration software, project management software
What are the big benefits (the big market-level differentiators)?
Ex: Small team collaboration tool, workflow automation, reusable project templates
Act 2: Develop the plot
Your customers’ specific needs (what will help them reach their goals from Act 1? These are similar to “Jobs-to-be-Done”):
Ex: Seamless integrations with communication tools like Slack & MS Teams
The concepts your customers need to know - core but broad activities:
Ex: Manage projects, collaborate with coworkers, etc.
Your specific persona: narrow from your target market:
Ex: Team leads at boutique consulting companies
Ex: Robust task management capabilities, including task dependencies
Your product’s specific value props and concepts
Ex: Increase visibility, spot blockers, improve productivity
Act 3: Resolution
Here are the quick notes on what goes here. You will refine these in Step 5 below.
Exact tasks and activities: these are the exact means, methods, steps, and tools they need to take to fulfill the needs outlined in Act 2. Ex:
Connect Your Calendar
Add a new project
Invite your teammates
How does the user get the initial value from your product? Ex:
Set up a first project
Add tasks
Pick a view
Invite teammates

Step 4: Map this info to your marketing funnel
The marketing funnel is a great framework for thinking about your onboarding. We tend to think of the upside-down triangle as a way to represent the number of people we interact with at each stage of the funnel. We can also use this “big-to-small sizing” to reference the amount of information we give away at each step.
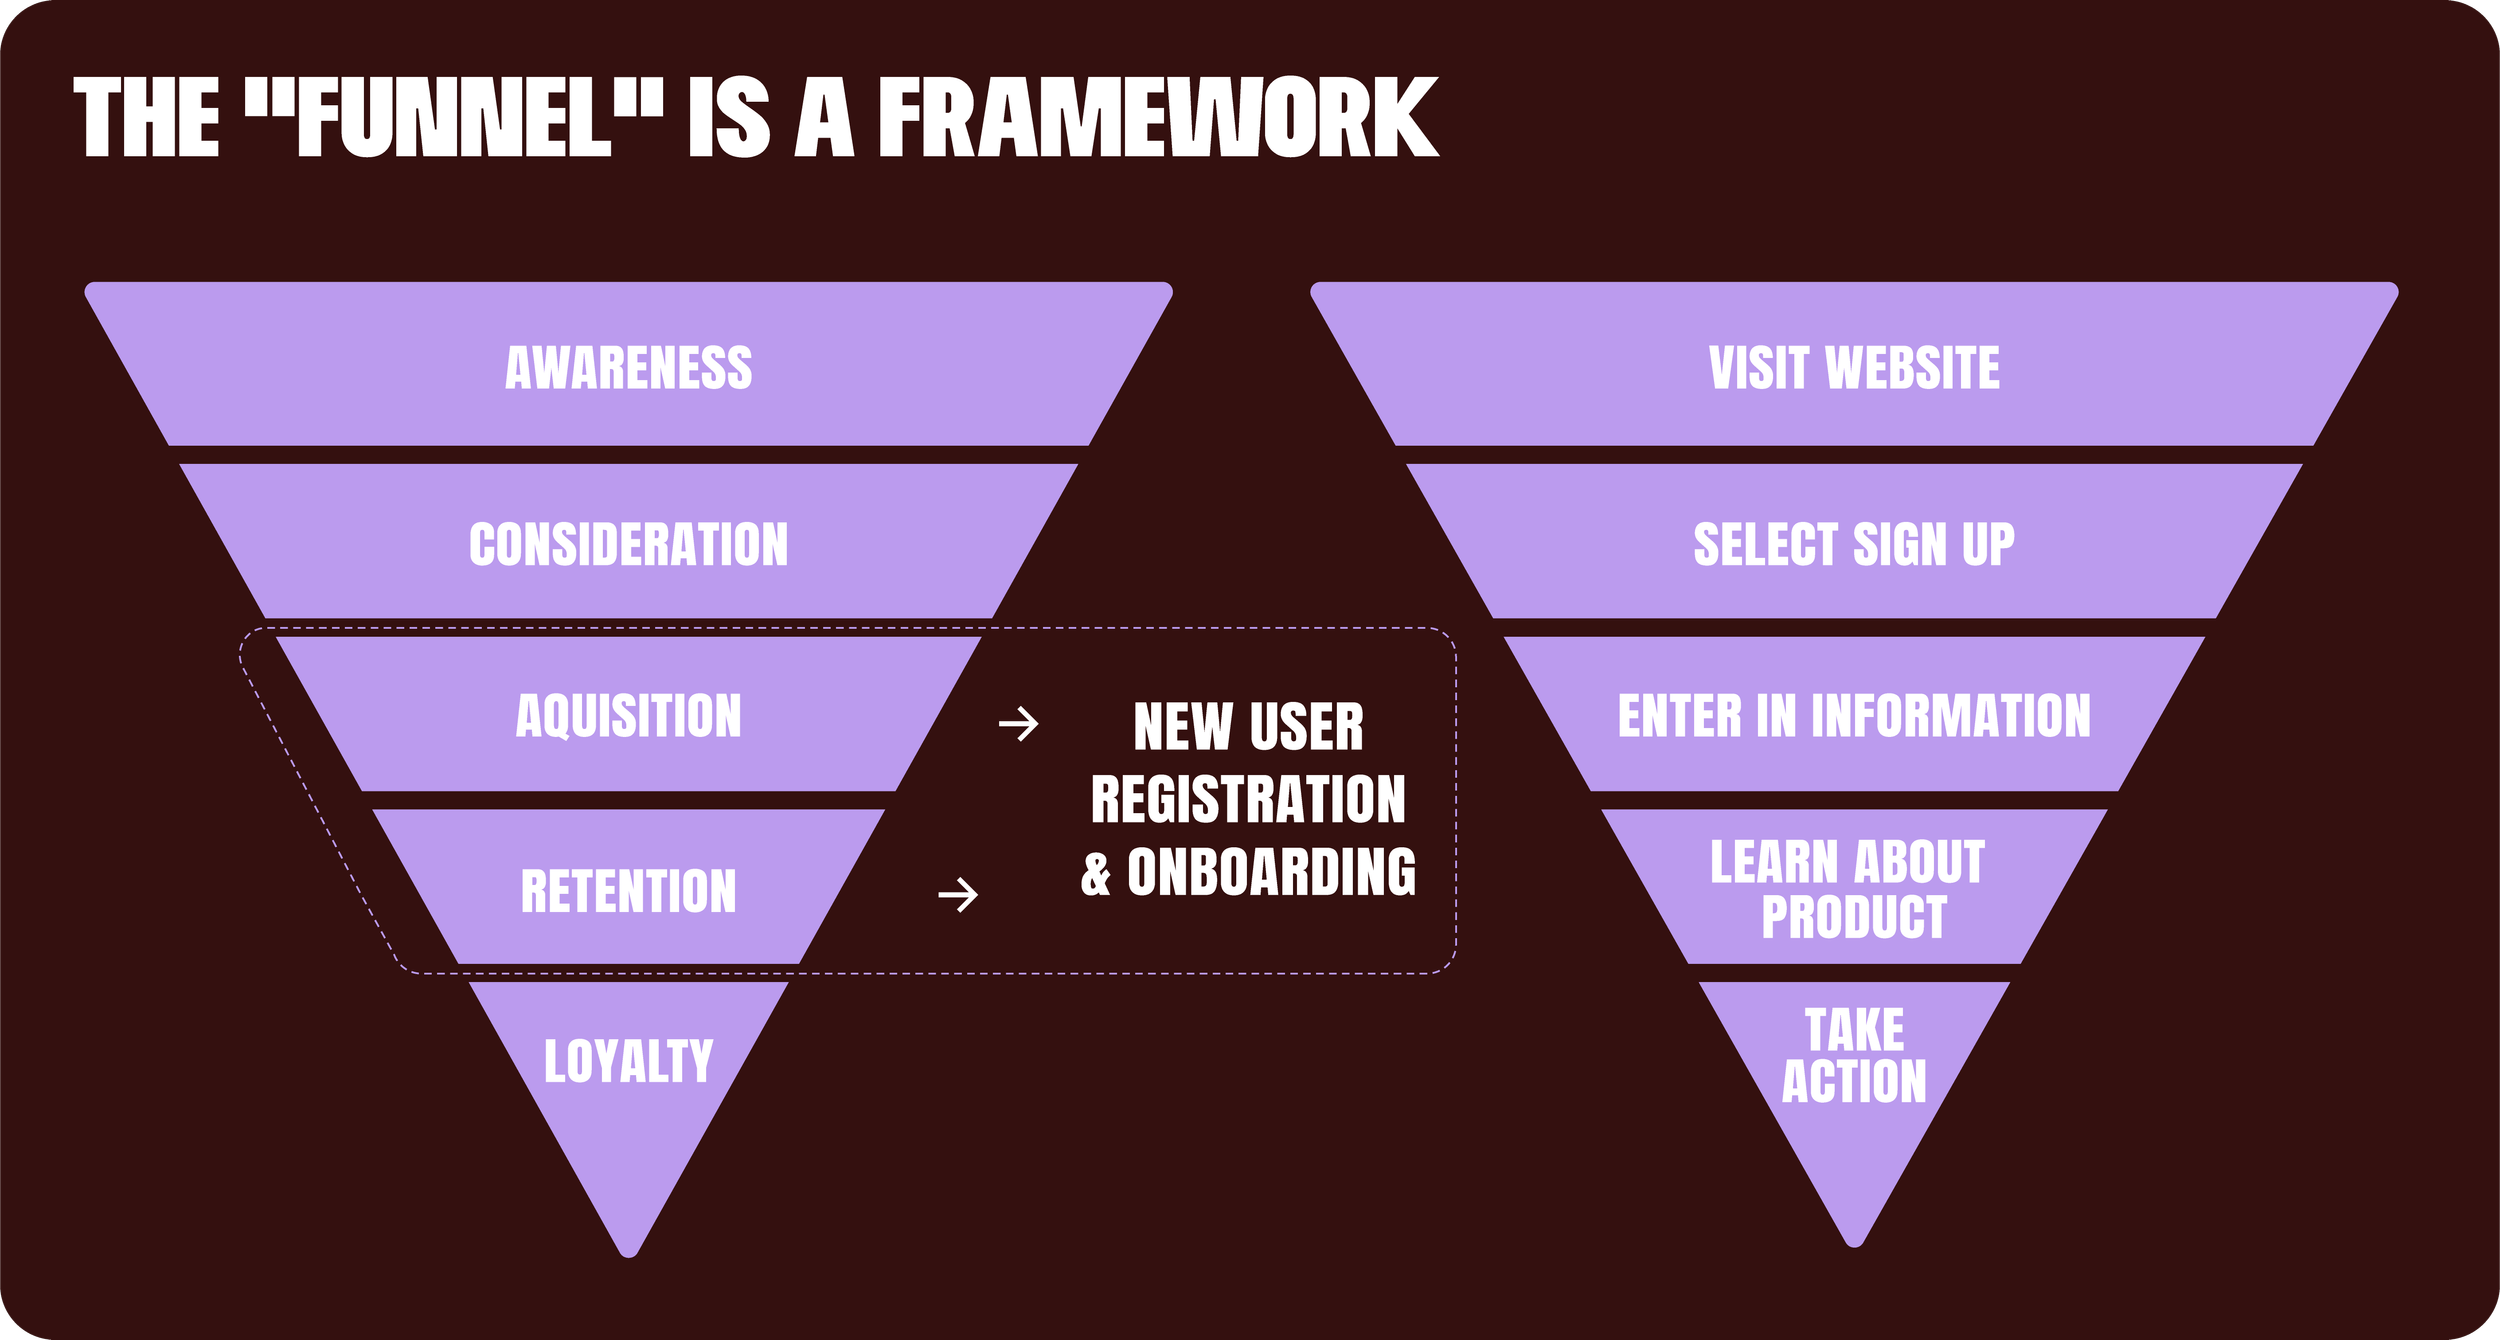
In awareness, the information we share is broad and general. By the time a customer becomes a user at acquisition and activation, the information we share increases in granularity and detail.
Coming back to the idea of being on a first date: at the top, on our first date, we may share our interest in traveling, and closer to the bottom, 1-2 months into the relationship, we reveal our deal-breakers as we’re planning a trip together.
In the image below, visualize your script/storyline from Step 2 to the different stages of the onboarding steps.

Step 5: Define and refine the Acquisition and Activation stages
For onboarding, acquisition covers account creation. The customer has become a user by supplying an email address and confirming that address. Yet, new users are different from active users. In onboarding, activation represents the user flow this new user must step through until your product delivers and demonstrates its initial value.
The activation user flow requires you to work with technical product managers and designers to identify the simplest activities to hook a new user. Often, products either provide too little information leaving a new user confused, or they overwhelm a user with too many possibilities.
For example, with a security-first email provider, I was able to increase their converted paid customers at a 2.8x higher rate by simplifying their suggested 3 steps to get started. One of their prior steps was for a new user to import their email and contacts from their previous provider. What a *huge* ask 😅!
In the new version, we prompted them to send their old email address a message from this new one so they could verify their display name appeared correctly. Far simpler!
For the acquisition and activation user flows:


Step 6: Test your onboarding
You don’t need to wait for a formal usability test to get feedback on your new/proposed onboarding flow and copy. Easy and cheap paper prototype testing can bring BIG insights. Use one piece of paper for each step, listing the information (from broad to specific) on each page. Your goal is to:
Ensure users interpret each page correctly.
Ensure the order of pages, steps, and information make sense.
Guarantee the “goldilocks” amount of information—not too much or too little—is available for the user to succeed.
Grab a friend, a partner, or a stranger at a coffee shop (note: if your product is super technical, a developer tool, or something like that, this exercise may not work if you just grab “anyone”). For each page, ask them the same questions you asked yourself in Step 2:
What are your first impressions?
What stands out to you?
What questions are coming to mind?
What do you want to do first/next?
What do you think this product is?
Step 7: Repeat steps 3-6 for the invited teammates
Now that we have an onboarding process for Sam, the direct customer and champion of our project management software, we must design the process for Sam’s team.
As you construct the onboarding for Sam’s team, be wary of assuming they will use it because it’s their job or Sam ordered them to. They need to be handled just like Sam. Meet them where they are, express that your product is there to help, and guide them with motivational and encouraging value propositions until they receive the initial value that lays the foundation for a great relationship moving forward.
Final Tips: Getting onboarding right
Here are the rules of the road 🛣️:
Begin with the “pitch” at the top of the marketing funnel.
Start at a high level, then slowly introduce the customer to your product.
Treat the journey like a first date: lead with your best foot forward, and don’t give away too much too soon.
Keep it simple and clear, no jargon.
Less is more! Don’t collect more user info than you need.
Small changes in the copy to encourage the user through each step can make a BIG difference.
Favor copy changes over brand-new functionality.
Use this bundle of assets to implement this step-by-step framework